Smart App Control (SAC) is a security feature in newer updates of Windows 11 that blocks applications it cannot verify as safe, even if they are digitally signed. It’s stricter than older SmartScreen checks and behaves differently depending on how the system was set up.
When Windows says:
“Smart App Control won’t allow this app”
“This app is not trusted”
…it means Windows does not recognize your app’s signature as coming from a publisher it trusts, or the app’s behavior/metadata doesn’t meet SAC’s criteria.
Course Designer 4 is a digitally signed’application. This means that you can trust that the application has not been altered or tampered with. However under the new stricter rules, even if the app is signed, SAC only trusts:
Microsoft Store apps
Apps signed with an EV (Extended Validation) certificate
Apps with a reputation in Microsoft’s cloud reputation system
A small developer certificate (like the one Course Designer has used for years) may not pass depending on how securely your Windows 11 has been configured. This can be true if you have downloaded it directly from the web using the Edge browser or from a cloud drive where you have kept a copy of the installer.
To proceed, you need to tell Windows 11 that you trust the application. You can do this as follows:
Steps:
Right‑click the installer or EXE (i.e. cd434en.exe)
Select Properties
On the General tab, look at the bottom for:
“This file came from another computer and might be blocked to help protect this computer.”
A checkbox labeled Unblock
Check Unblock
Click Apply, then OK
Run the installer again
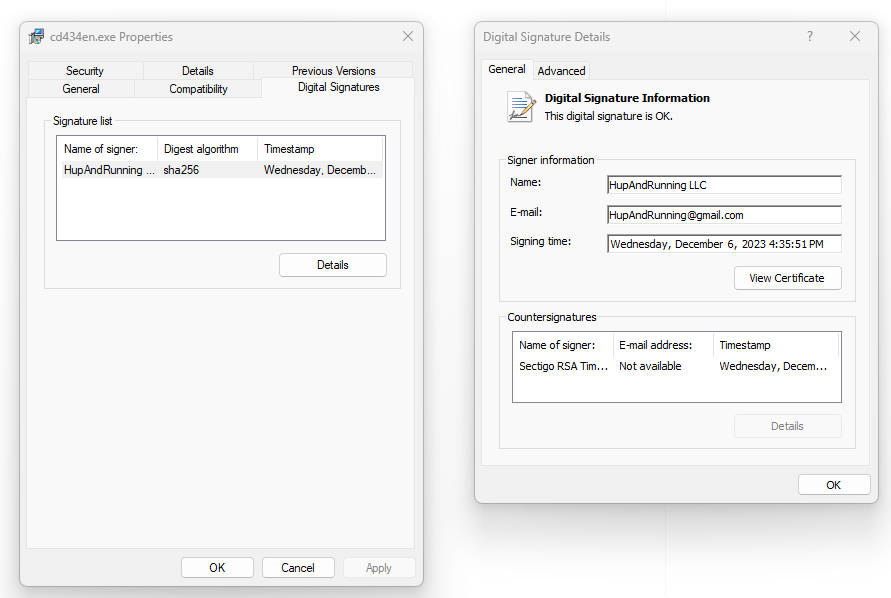
If you are unsure whether you can trust the installer executable, you can view its security certificate yourself. To do this, right‑click the installer (e.g., cd434en.exe), select Properties, and then open the Digital Signatures tab. A secure copy of the installer will show the correct publisher information and should look like this:
The only correct, secure publisher of Course Designer 4 is “HupAndRunning LLC”
Subscribe to make sure you are notified when there is a new post!
From time to time, designers are curious about adding images and/or watermarks to a finalized course diagram. That ability is not a built-in feature of Course Designer 4, but it is easy enough to do using free third-party software. This video shows an informal demonstration of one way to accomplish this.
The two applications demonstrated in this video can be downloaded here:
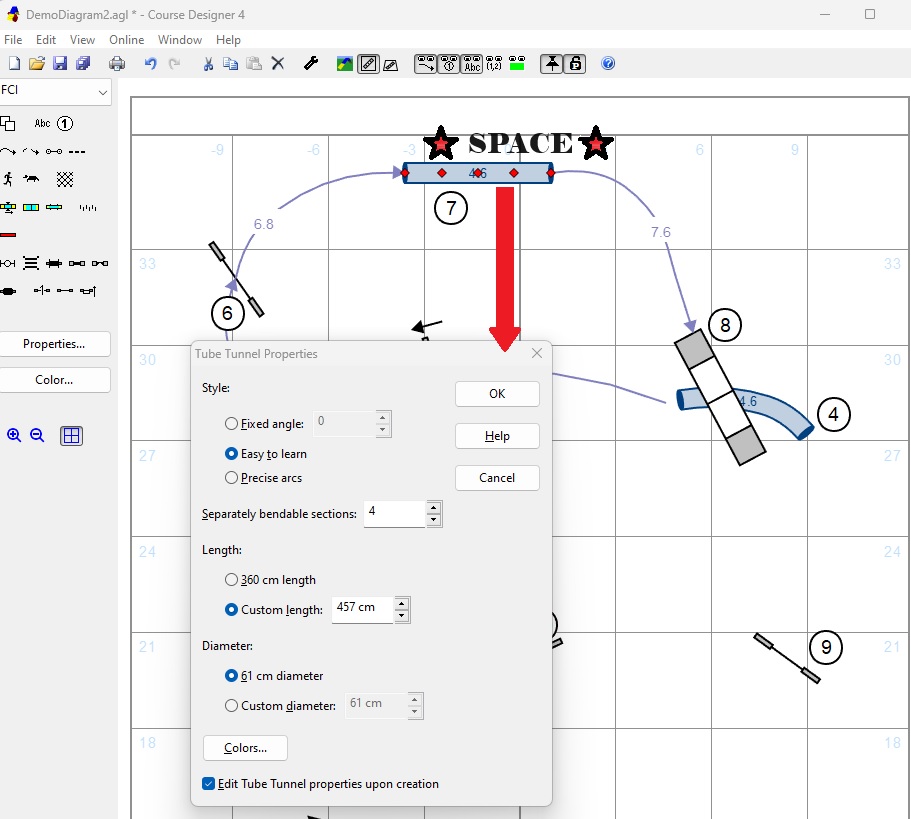
With Version 4.34, you can choose to display the length of a tunnel using the Edit/Preferences…. menu item. But – you may have noticed as judges are starting to post diagrams made with 4.34 lately that sometimes the length is a ‘transparent’ number that blends into the tunnel background color….
… and sometimes it is not transparent.
This property depends on which ‘Graphics System’ that CD4 is set up to use. Particularly in the Windows PC world, there is a very large variety of hardware platforms and graphics cards in use. CD4 tries to accommodate not only this wide hardware variety, but also a large number of (Windows and older Mac) versions so that people don’t have to upgrade their systems in order to continue using CD4.
Most of the time, CD4 will automatically select the graphics system that has the least impact on your system. (It can even ‘downgrade’ the graphics system to a less CPU intensive one if it detects that your system is running sluggishly). And the one that it has auto-selected may not be the one that supports transparency.
If you don’t see that transparency on your system, you can tell CD4 to try a different Graphics System. In many cases, this option will be available to you using the Help/Graphics System… menu item.
If you don’t see this menu item though, you can still access it by clicking anywhere on an open diagram and typing the letter ‘G’ and ‘R’. This brings up a dialog that looks like this:
Take note of the currently selected Graphics System in case you want to fall back to that. If you want your tunnel lengths to be transparent, you will currently need to select “Direct 3D”. Note that you need to restart CD4 in order for the change to take effect.
Subscribe to make sure you are notified when there is a new post!
Version 4.34 is both a maintenance release (i.e. fixes issues) and feature release (i.e. adds new things).
This is also the first release that supports the integration with this new blog. Previously Facebook was used to make announcements and that resource will continue. It can however be difficult to ‘find things’ on Facebook and this blog should be an easier place to post and maintain a Questions and Tips section making it easier to use Course Designer 4.
Consider following this blog (click on the Subscribe button below) to be notified of new posts.
Now, on to the Version 4.34 changes…
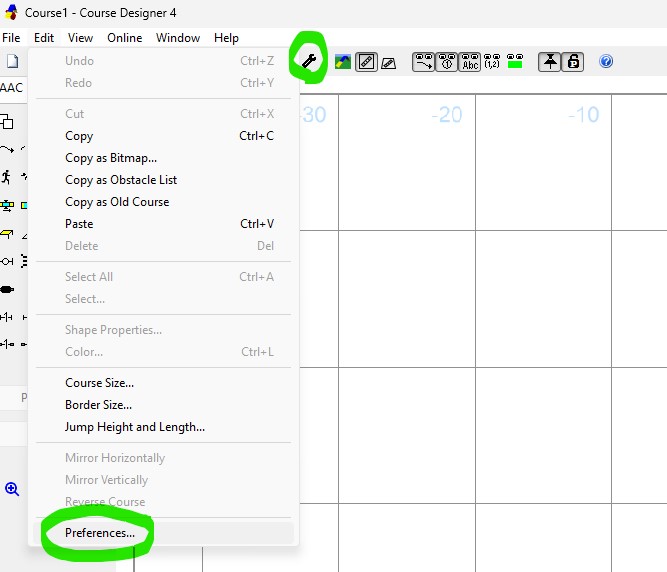
New Feature – User Preferences
Use the Menu command Edit/Preferences and/or the tool-shaped icon on the Toolbar to access User Preferences. These user preferences can be enabled/disabled and apply to all open courses being worked on.
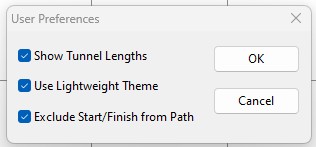
User Preferences include:
Display of tunnel lengths (in imperial or metric units depending which was chosen under the ‘View’ menu).
Selection of how the course is displayed: either the ‘classic’ course designer theme most suitable for visibility while designing as well as for printing and publication, vs a ‘lightweight’ theme suitable for webpages and social media posting
Selection of whether start/finish lines should be connected or disconnected from the dog path (disconnecting may be very desirable both for a cleaner look and for games classes as Gamblers and Snooker).
Future releases will expand on this initial set of User Preferences.
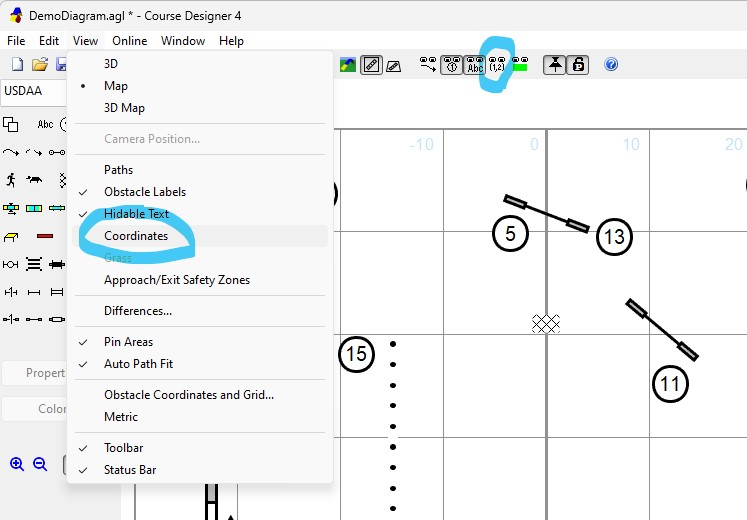
New Feature – Coordinate Toggling
Previous versions of Course Designer 4 involved a multi-step procedure to turn off/on display of obstacle coordinates. Coordinate view is now easily toggled for the current diagram using either a menu item or a toolbar button. The original Obstacle Coordinates and Grid options dialog can still be accessed using either the View menu or by right-clicking anywhere on a course diagram.
New Feature – Approach/Exit Safety Zone Visualizer
Several agility organizations have design guidelines that require contact or spread approaches to have a safe zone of approach within a specified distance to a contact or specialty jump. Some have similar guidelines for a safe full speed exit from these obstacles so that dogs with running contacts or lots of extension in the performance of a spread jump or tire have both safe clearance and room to safely change leads.
Display of these zones (with a distance and width appropriate for the selected organization) are easily toggled for the current diagram using a new View menu item or toolbar button so the designing judge or instructor can see that the intended dog path safely travels through the bar indicating the beginning/end and width of the zone.
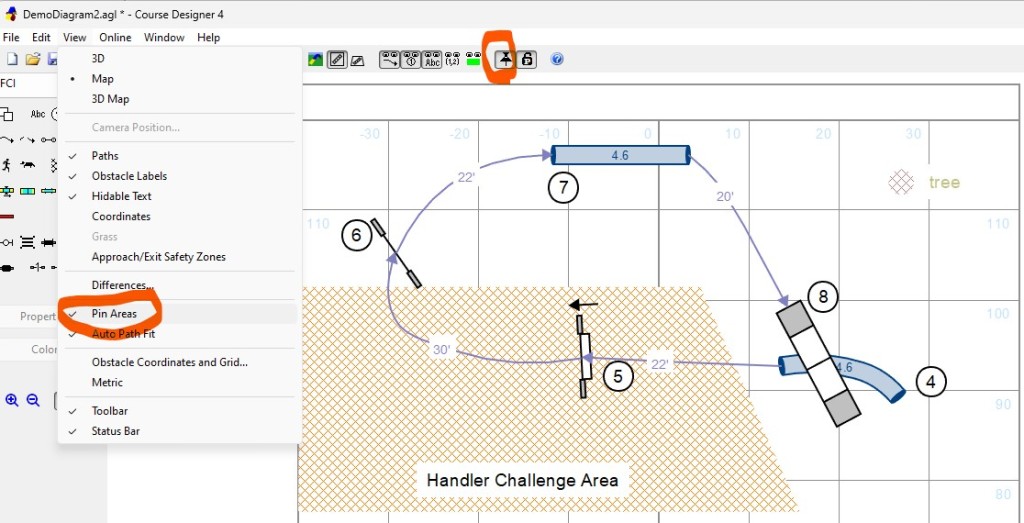
New Feature – Pin Unusable Areas
Unusable areas are often used by course designers to designate portions of the course area that represent hazards (posts/holes/trees), actual unusuable areas (rounded arena corners/storage areas), or handling zones that handlers are expected to stay in (exchange areas, distance handling challenges). But previously these areas were a little too easily selected and moved. All such areas can now be ‘pinned’ into place where they cannot be accidentally selected and moved. This ability is easily toggled for all open diagrams using a new View menu item or toolbar button
New Feature – Enable/Disable Dog Path Auto-Fit
Course Designer 4 of course contains the ability to construct dog paths that automatically connect to obstacles. But…. these paths are not necessarily representative of the type of agility being designed for. Course designers have always had the ability to select a path and make adjustments to reflect their theory of what the intended path should look like. However…. as soon as an obstacle is moved or adjusted, CD4 would Auto-Fit the path to the new obstacle configuration.
In this release, once a design is close to being finalized, designers or instructors may now lock or unlock CD4’s Auto-Fit Path function. Locked (the normal and startup mode for CD4) means the program will attempt to make Auto-Fit adjustments. This ability is again easily toggled for all open diagrams using a new View menu item or toolbar button.
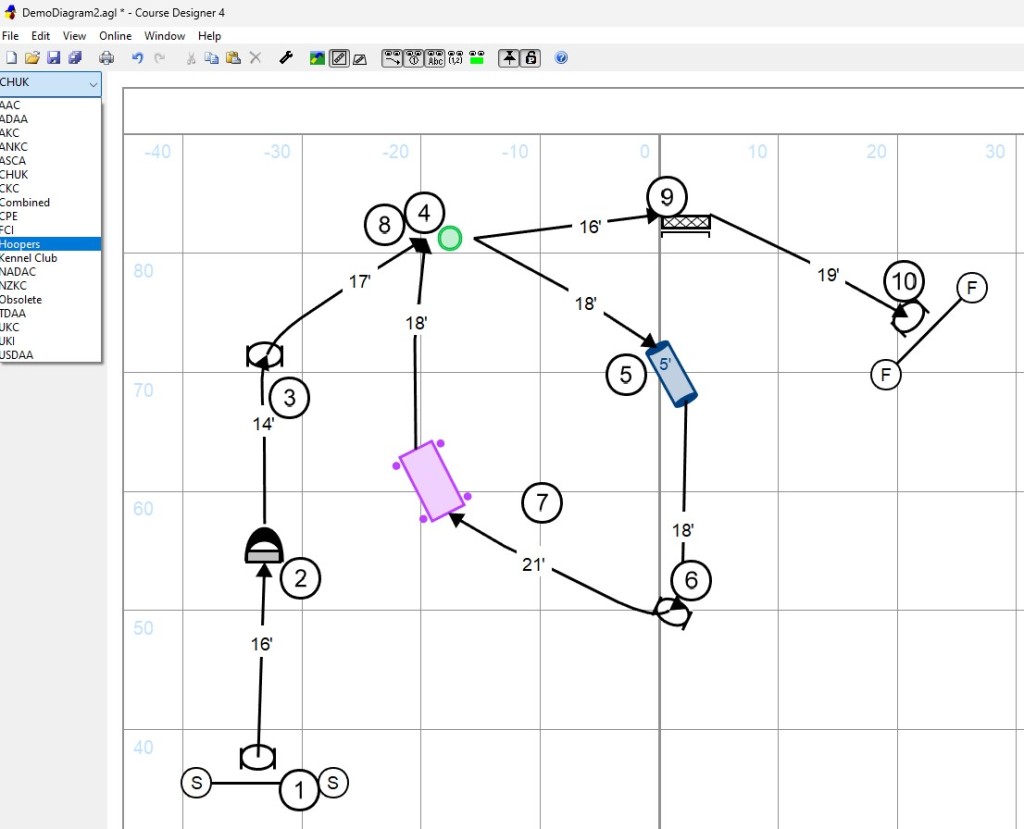
New Feature – New Obstacle Palettes
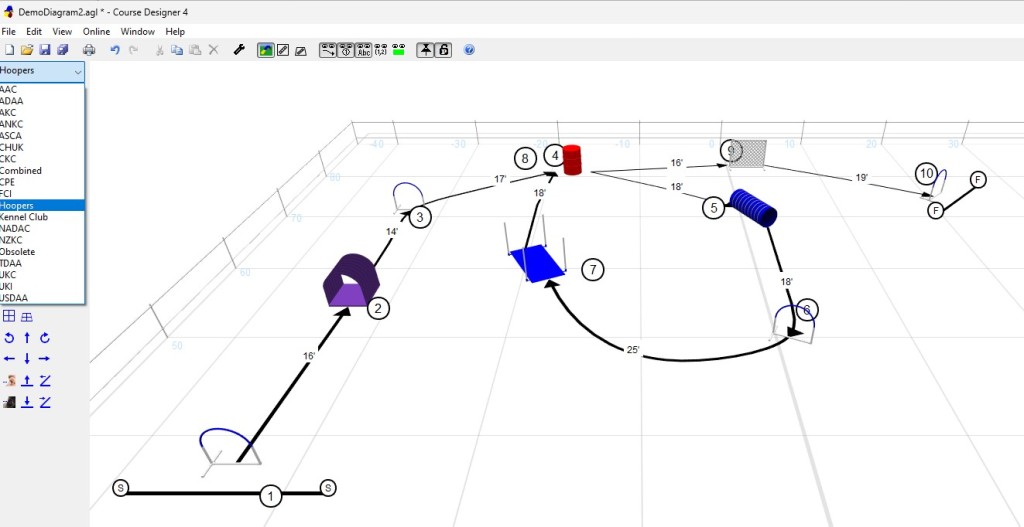
New obstacle palettes have been added for the organizations ANKC and CHUK, as well as a generic Hoopers class so that it is no longer necessary to use the NADAC and Combined palettes.
In addition, Hoopers style obstacles now have full support in the 3D design representation.
New Feature – Italian Language Support
Course Designer 4 now comes in an Italian version
New Feature – New Release Notification
When Course Designer is first started, it now checks to see if newer versions or major announcements to this blog are currently available. If there are, the ‘NEW’ icon will appear. You can click on that icon to find out what’s new. Even without the NEW icon present you can doublecheck by clicking on the ‘Check for Updates…’ option under the Online pulldown menu.
Most of the time, you will want to stay with the most current released version. However, you also have the option to download ‘beta’ releases that contain a subset of fixes and features to go into the next release.
Bonus Feature – Additional Shortcut Key Action for Spacebar
With this release, any time you have an obstacle selected on the course, you can use the spacebar key to bring up its properties dialog
This joins the other shortcut behavior for the spacebar already present in CD4 where the spacebar and other shortcut keys are used to quickly cause a color change:
Select the obstacle
Ctrl-L shortcut to bring up the color dialog
Click on the color you want (unless it’s already selected)
Hit the spacebar: the color will be applied and the color dialog closed.